Hydejack theme usage
in Linux programing on jekyll
Table contents
- Working in Hydejack
- jekyll directory structure
- Config
- Post
- Page
- Collection
- Adding Sidebar in jekyll
- Sidebar&page&list example
- Authors
- Issue
Working in Hydejack
_config.yml, Gemfile 의 초기 설정
jekyll을 시작하기 전에 필요한플러그 인이나 기본 설정을 완료해야한다.
_config.yml
블로그의 URL, Name, DIsqus, Collection, Markdown Converter…등
jekyll이 동작하고 블로그에 필요한 초기 정보를 담고 있다.
주로 플러그인과 블로그의 설정.
Gemfile
주로 해당 블로그에 적용되는 플러그인이 gem으로 동작할수있게 명시해줌
테마에 대한 remote나 jekyll의 버전 에 대한 정보를 담고있음
루트 폴더에서 index.md를 찾아서 가장 먼저 보여준다
index.md에 있는 Fornt matter의 layout에 해당 하는 html문서를 템플릿처럼
사용해서 동작함
_layout 에 있는 layout 문서들은 _Include안에 문서들과 연동
_include 안에는 head.html, body.html… 등 다양한 기본 문서가 존재함
여기 있는 문서들은 전부 웹페이지의 한 부분을 보여주기 위해 필요한 요소 들이다.
만약 html만으로 웹페이지를 만들었다면 _include 안에 있는 문서들이 한곳에
통합 되어 있을것이다. 하지만 효율적으로 캡슐화 하여 필요한곳에 쓰이게
각 용도 별로 나눠져있다.
웹페이지가 돌아가기 이전에 _js폴더에서 자바 스크립트가 동작
웹알못이기 떄문에 이부분은 좀더 공부한 후에 작성
jekyll 에서 다양한 Collection이 있지만 기본적으로 구성된 Collection은 _post이다
만약 다른 Collection이 없다면 jekyll 은 _post에 있는 Markdown문서들은 나열할것이다.
하지만, _config.yml에 다른 Collection이 명시되어 있다면 해당 Collection은
_post Collection을 먼저 rendering 하여 보여준다.
jekyll directory structure
지킬 기본 디렉토리 구조는 이런식입니다. 기본 구조를 알아두고 적용하고 싶은 테마에 구조와 비교해보면서 알아가는게 이해가 빠를것 같습니다.
.
├── _config.yml (지킬 환경설정 정보)
├── _drafts (아직 게시하지 않은 초안으로 파일명 형식에 날짜가 없음)
|   ├── begin-with-the-crazy-ideas.textile
|   └── on-simplicity-in-technology.markdown
├── _includes (포스트 레이아웃이 들어 있는 폴더, 레이아웃의 헤더파일 같은것)
|   ├── footer.html
|   └── header.html
├── _layouts (실제 레이아웃이 존재하는 폴더, Liquid 태그를 사용함)
|   ├── default.html
|   └── post.html
├── _posts (게시한 포스트를 저장하는곳,날짜 명칭 형식을 반드시 맞춰야함)
|   ├── 2007-10-29-why-every-programmer-should-play-nethack.textile
|   └── 2009-04-26-barcamp-boston-4-roundup.textile
├── _data (사이트에 사용될 데이터가 저장되어 있는곳)
|   └── members.yml (site.data.members 라고 입력하면 해당 데이터 사용가능)
├── _site (지킬이 변환작업을 마친 포스트가 저장되는곳)
├── .jekyll-metadata (지킬이 동작하면서 빌드내역등에 대한 정보를 저장)
└── index.html (yaml 머리말을 세션을 가진 모든 파일을 찾아 변환작업함)
hydejack 구조
지킬도 분명
index.html을 우선으로 보여줄것이다. 근데 지킬은 index.md를 우선시한다.기본구조에서 index.md 가 존재하는곳이 어딘지 보면 알기 쉽다.
├──_data
├──_featured_categories
├──_featured_tags
├──_includes
├──_js
├──_layouts
├──_posts
├──_sass
├──assets (이미지 문서등 자원폴더)
├──_config.yml
├──404.md
├──about.md
└──index.html
Config
_config.yml
Github page 깃허브 페이지에 호스팅 할때 url형식은 http://
.github.io 의기본형식을 따른다. (따로 도메인을 설정하지 안았을때) baseurl 은 당신이 호스팅한 페이지에 따라 달라진다. Plugin _config 에서 다양한 플러그인과 현재 페이지의 각종 정보를 담고 있다.
예를 들어disqus의 기능을 추가하려고 할때 여기에 명시해 주어야한다.
물론font에 관한 내용도 여기에 들어가야한다. 일단은 그렇게만 알고 있고
블로그를 만들어 가면서 파악하면될듯.
Post
_post
jekyll 는 다양한 collection을 생성할수 있다.
하지만 기본적으로 post라는 collection을 가지고 있고, _post폴더에 있는 post 들을 보여준다.
Issues
Page
거의 모든 웹환경의 설정은 루트폴더에서 index.html 인 파일을 찾아 홈페이지로 보여줌 물론 지킬도 이런 관례를 따름
- 페이지의 위치 html을 생성하는 위치에 따라 두가지 방법있음.
- 사이트의 루트 폴더에 각 페이지병 HTML을 만든다.
- 사이트의 루트 폴더에 각 페이지 별 폴더를 만들고, 각 폴더에 index.html 파일을 만든다.(이게 좋아 보임)
HTML파일에 이름쓰기
루트 디렉토리에 생성하고자 하는 페이지 이름을 가진 HTML파일을 추가하는것
 .
 |-- _config.yml
 |-- _includes/
 |-- _layouts/
 |-- _posts/
 |-- _site/
 |-- about.html    # => http://yoursite.com/about.html
 |-- index.html    # => http://yoursite.com/
 └── contact.html  # => http://yoursite.com/contact.html
디렉토리에 이름을 짓고 인덱스 HTML파일 넣기
루트 폴더에 페이지마다 폴더를 만들고 그안에 index.html을 넣어주는것이 단순해 지고 관리가 쉬워짐
.
├── _config.yml
├── _includes/
├── _layouts/
├── _posts/
├── _site/
├── about/
|   └── index.html  # => http://yoursite.com/about/
├── contact/
|   └── index.html  # => http://yoursite.com/contact/
└── index.html      # => http://yoursite.com/
Collection
Jekyll 에서 제공하는 Collection 정의 참고
Collection은 티스토리 같은 블로그의 tag와 category기능이랑 비슷하다고 보면됩니다.
물론 Jekyll 에서는 그런 기능들을 만들어줘야 할뿐입니다.
Hydejack에서 제공하는 Collections은 tag, category 이다.
하지만 사용자에 의해서 따로 Collection을 설정하여 사용할수도있다.
# 다음은 jekyll 루트 폴더의 Collection구조입니다.
./
...
├── _featured_categories
├── _featured_tags
├── _my_collection
...
# Hydejack이 제공하는 tag와 categry가 있지만
# 추가적으로 _my_collection을 만들었습니다.
my collection을 tag나 category같은 기능 으로 사용하면서
my collection안에 작성된 post들을 새로운 분류로 나열 하려고함.
- _config.yml 에 collection 추가
# _config.yml
# Collections
collections:
  featured_categories:
    permalink:         /category/:name/
    output:            true
  featured_tags:
    permalink:         /tag/:name/
    output:            true
  my_collection:
    permalink:         /my_collection/:name/
    output: true
- 루트 폴더에 카테고리명으로 폴더 생성
./
...
├── _featured_categories
├── _featured_tags
├── _my_collection  -> 반드시 폴더명은 collection이름 앞에 `_`를 붙여줘야합니다.
...
- _my_collection 폴더 안에 index.md생성
./
...
├── _my_collection
	├── index.md
	├── samplecollection.md
	├── samplepost.md
...
# index.md
---
layout: default
title: my collection list
description: >
  my collection의 새로운 분류에 따른 카테고리 리스트를 보여주려 합니다.
menu: true
order: 1
---
# samplecollection.md
---
layout: list
title: 새로 분류할 collection 입니다.
description: >
slug: test -> tag나 category의 slug같은것
---
# samplepost.md
---
layout: post
title: sample post 입니다.
description: >
my_collection: [test]
categories: [category_test]
tags: [tag_test]
---
이제 기본 골격은 다 갖췄습니다.
my collection에서 보이고 싶은 포스트나 내용을 입맛에 맞게 바꾸면 됩니다.
Issues
Adding Sidebar in jekyll
---
layout: page  =>page 와 list중에 어울리는걸로 하면될듯
title: test_page =>사이드바에 표시될 이름
description: >  => 해당 사이드바에 대한 설명
test sidebar => 여기부분부터 쓸때 반드시 스페이스바로 두칸 띄고 써야됨. 절대 탭이나 적거나 많게 띄면 에러남
menu: true =>이 속성을 넣어줘야 사이드바에 나타남
order: 7 => 사이드 바에서 표시될 순서임
---
#사이드바에 추가하고 싶으면 폴더 이름은 아무거나 상관없음
#폴더 안에 index.md가 있어야 하고 위의 yaml 헤더가 있어야함.
_featured_tags anytitle.md 를 만들고 위의 내용 넣어주면됨.
폴더에 index.md 만들기 anytitle.md 만들고 위의 내용 넣어주면됨.
Sidebar&page&list example
#먼저 testfolder를 사이드바에 추가하기 위해
#루트 위치에 같은 폴더 명을 만들어줬습니다. 물론 폴더명을 동일하게 만든것은
#그냥 보기 이쁘고 관리 하기 편할것 같아서 그런거지 굳이 일치 시킬필요는 없습니다.
$ tree -L 2
.
...
├── testfolder
    ├──index.md
├── _post
    ├──...
    ├──2018-05-05-testpost.md
    ├──2018-05-05-testpage.md
    ├──...
└── ...
#저는 사이드바에 추가된 testfolder에 testpost로 태그된 목록들을 보여주려합니다.
#물론 _post폴더 안의 testpost 와 testpage도 testpost로 태그되어 있습니다.
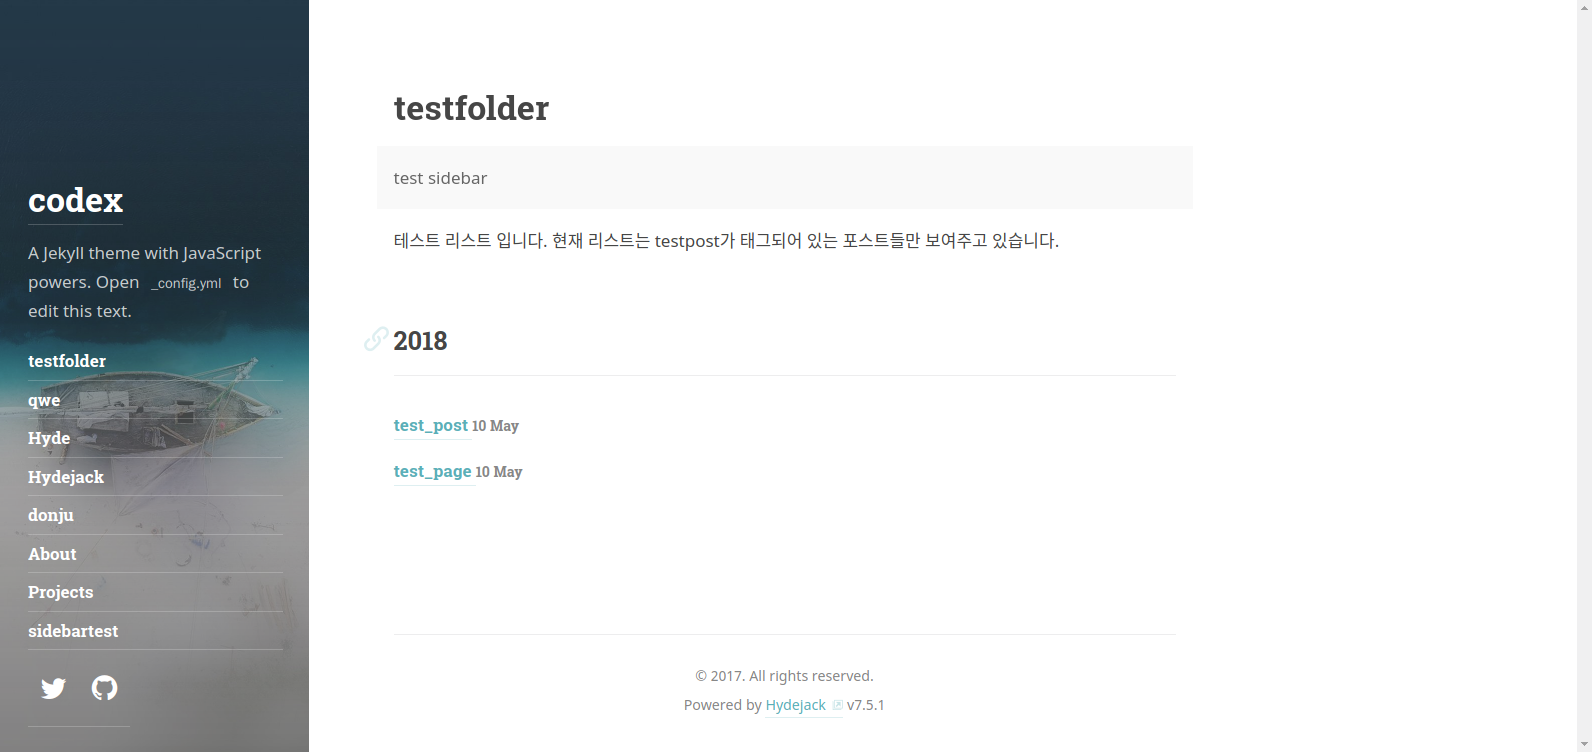
그럼 이제 밑의 사진 처럼 구성이 되어 있을것입니다.
이제 각 폴더와 파일들을 상세하게 살펴보면 될것같습니다.
- testfolder 테스트 폴더 안에는 index.md가 있습니다. 테마의 내부설정에 의해서 index.md를 우선으로
읽어 오고 yaml헤더에 따라 용도와 방법이 구분됩니다.
# index.md
---
layout: list
title: testfolder
slug: testpost
description: >
     test sidebar
menu: true
order: 1
---
테스트 리스트 입니다.
현재 리스트는 testpost가 태그되어 있는 포스트들만 보여주고 있습니다.
- layout : list로 설정 하셔야 해당 태그로 연결된 포스트들을 보여줍니다.
- slug : 슬러그에 설정된 이름으로 관련된 태그를 가져옵니다.
- menu : sidebar에 추가 하기 위해선 true로 해줘야 합니다.
- order : 사이드바에서 보여질 순위입니다. 위의 그림에서 보면 첫번째로 위치함.
태그된 포스트들
현재는 두가지의 다른 포스트를 준비했습니다.
# 2018-05-05-testpost.md
---
layout: post
title:  test_post
date:   2018-05-10 16:06:59 +0900
tag: [testpost]
---
테스트 포스트입니다. 현재 태그는 testpost입니다.

# 2018-05-05-testpage.md
---
layout: page
title:  test_page
date:   2018-05-10 16:06:59 +0900
tag: [testpost]
---
테스트 페이지입니다. 현재 태그는 testpost입니다.
Authors
about 페이지나 각 포스트들의 footer에 사용자의 사진과 정보가 표시될수있게함.
_layout/about.html
about 페이지를 만들때 쓰임.
# _layout/about.html
{% assign plugins = site.plugins | default:site.gems %}
<article class="page" role="article">
  {% assign author = site.data.authors[page.author] | default:site.data.authors.first[1] | default:site.author %}
이부분이 _data안에 있는 authors.yml문서의 값을 불러옴
  {% if author.picture %}
    {% include srcset-img.html class="avatar" img=author.picture alt=author.name %}
  {% elsif plugins contains 'jekyll-avatar' %}
    {% assign avatar = author.social.github | default:author.github.username | default:author.github %}
    {% include avatar-tag.html user=avatar %}
  {% endif %}

  <h1 class="page-title hr">{{ page.title }}</h1>

  {{ author.about | markdownify }}

  {% include message.html text=page.description hide=page.hide_description alt="" %}

  {{ content }}
</article>
_include/about.html
_date/authors.yml
여기 안에서 author1, author2 등으로 사용자의 이름, 주소, 사진, github 등을 정의함
Issues
Issue
Github page defendency Problem
Gemfile 에 다음 내용 추가
require 'json'
require 'open-uri'
versions = JSON.parse(open('https://pages.github.com/versions.json').read)
gem 'github-pages', versions['github-pages']
$ bundle update $ bundle install
Header tag by korean is not working
이부분에서 삽질 많이 했습니다. 웹알못이라 아무리 검색하고 찾아봐도
이유를 알수가 없었습니다. 그리고 결국 해결했지만 완벽한 방법은 아닙니다.
혹시라도 방법을 알고 계시다면 댓글에 써주세요 ㅠㅠ
우선 문제의 내용을 보여 드릴꼐요.
// 2018-01-01-test.md
...
## 내부링크 테스트
...
// 2018-01-01-test.html ->jekyll를 통해 html 변환후
...
<>
...

...
문제 해결을 위해 시도했던 방법들입니다.
Font 교체(실패)
혹시나 font의 문제 때문에 그런줄알고
google font에서한글지원이 되는 폰트로 교체하였습니다. 하지만 실패…
New collection listing
콜렉션에서 새로 분류한 카테고리별로 리스팅
_my_collection폴더 안에 index.md의 기능 추가하고,
새로운 레이아웃에 해당 기능을 추가하고 index.md에서 mycategory를 적용하여 해결.
my collection에 존재하는 class들의 리스트를 만들어줘야 한다.
# _layout/mycategory.html
<article class="page" role="article">
  <header>
    <h1 class="page-title">{{ page.title }}</h1>
    {% include message.html text=page.description hide=page.hide_description %}
  </header>
  {{ content }}
{% for test in site.my_collection %}
{% if test.title != page.title %}
    {% if test.layout == "study_post" %}
    {% assign studycoll = test.title | join:'|' | append:'|' %}
    {% assign scoll = scoll | append:studycoll %}
<h2><li><a href="{{ test.url | prepend: site.baseurl }}">
       {{ test.title }} </a></li></h2>
    {% endif %}
{% endif%}
{% endfor %}
</article>
# _my_collection/index.md
---
layout: mycategory
title: Study
description: >
menu: true
order: 2
---
New collection classifying post
새로운 카테고리에서 해당 분류로 모아진 post listing
새로 분류된 class에서 _my_collection 안에서 작성된 포스트들을 보여줘야한다.
레이 아웃에 mylist.html 을 만들어서 해당 기능 넣고 해결.
# _layout/mylist.html

{% for post in site.my_collection %}
{% if post.my_collection contains page.slug%}
   <li>
  <a href="{{ post.url | relative_url }}" class="h4 flip-title">
    <span>{{ post.title }}</span>
  </a>
  <time class="heading faded fine" datetime="{{ post.date | date_to_xmlschema }}">
  {{ post.date | date:list_entry }}</time>
</li>
{% endif%}
{% endfor %}
# _my_collection/index.md
---
layout: mylist
title: 새로 분류할 collection 입니다.
description: >
slug: test -> tag나 category의 slug같은것
---
List layout can’t listing post in mycollection
기존에 있던 list에서 my collection에 있는포스트를 못불러옴
Hydejack에서 제공하는 list layout에서 mycollection에 있는 포스트중
tag와 category 로 분류 되있는 포스트를 못불러옴.
list layout에 my collection에 있는 tag와 category를 가진 포스트를 불러오게끔 해서 해결
# _layout/list.html
...
{% assign category = site.featured_categories | where: "slug", page.slug | first %}
{% if category %}
  {% assign posts = site.categories[page.slug] %}
  {% assign s_category = site.my_collection | where:"categories", page.slug%}
  {% assign posts = posts | concat: s_category %}
{% else %}
  {% assign tag = site.featured_tags | where: "slug", page.slug | first %}
  {% if tag %}
    {% assign posts = site.tags[page.slug] %}
    {% assign s_tag = site.my_collection | where:"tags", page.slug%}
    {% assign posts = posts | concat: s_tag %}
  {% else %}
    {% assign posts = site.posts %}
  {% endif %}
{% endif %}
  {% if posts%}
  {% assign posts = posts | sort: 'date,title' | reverse %}
  {% endif%}
 ...
home Layout can’t show the post in mycollection
_layout/default.html 에 mycollection내용도 보여지게 추가
  <!--fix-->
    {% assign allpost= site.posts %}
    {% assign study_post = site.study | where:"layout", "post"%}
    {% assign allpost = allpost | concat: study_post %}
  {% if site.posts.size > 0 %}
    <h2 class="hr">{{ strings.posts | default:"Posts" }}</h2>
    <ul class="related-posts">
      {% for post in allpost limit:10 %}
        {% include post-list-item.html post=post %}
      {% endfor %}
    </ul>
  {% endif %}
  <!--fix-->
Can’t show picture in about page and footer
about페이지와 footer에 사진이 안나옴
./_date/author.yml 에서 srcset부분 삭제 해서 해결
...
srcset:
     1x:            https://placehold.it/128x128
     2x:            https://placehold.it/256x256
...
show the mycollection slug in any post
모든 포스트에서 mycollection의 slug표시
_include/post.html에서 mycollection의 slug를 표시하도록 수정
...
 {% assign study_start     = site.data.strings.study_start     | default:"at " %}
 {% assign study_separator      = site.data.strings.study_separator      | default:", "  %}
...
 {% include tag-list.html tags=post.study meta=site.study start_with=study_start separator=study_separator %}
...
_data/strings.ymll에서 mycollection의 slug 표시방법 추가
...
#Seperators
study_start:             'at '
study_separator:         ', '
...
index.md of location
.
├── _data
├── _featured_tags
├── _includes
├── _js
├── _layouts
├── _posts
├── _sass
├── _site
├── assets
├── docs
│   └── 7.5.1
│       └── index.md
├── index.md
└── licenses
Whole structure
.
├── Gemfile
├── Gemfile.lock
├── LICENSE.md
├── NOTICE.md
├── _config.yml
├── _data
├── _featured_tags
├── _includes
├── _js
├── _layouts
├── _posts
├── _projects
├── _sass
├── _site
├── about.md
├── assets
├── docs
├── index.html
├── index.md
├── licenses
└── posts.md